Cute Fish Aquarium Popsicle Craft for Kids (Free Template)


Looking for a simple, hands-on activity that brings a splash of underwater adventure to your little one’s day? This easy aquarium popsicle craft is the perfect way to keep kids entertained while they dive into a world of colors, summer, and a touch of DIY fun.

There are affiliate links in this post – please read my full disclosure policy. As an Amazon Associate, I earn from qualifying purchases.
Whether it’s a rainy afternoon or you just need something fun to fill the day, this cute and colorful craft is a great way to keep those little imaginations going. Grab some popsicle sticks, round up the kids, and let’s create a mini underwater scene!
This craft is perfect for summer just like our Easy Paper Bag Jelly Fish Craft for Kids and these 19+ Easy DIY Fish Crafts for Kids.

🌟Don’t Leave Before You Check Out These Fun Ideas!🌟


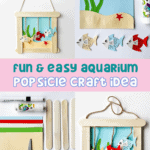
📌What You’ll Need
Construction Paper (light blue, light yellow, green, and your choice for the fish.
Yarn – or you can use twine, this is to hand the craft when you are finished.
Popsicle sticks
Hot glue gun & glue
Markers – fine tip markers work perfectly since the fish are somewhat small.
Free Template – be sure to download the template at the bottom of this post.

✨How to Make the Aquarium Popsicle Craft
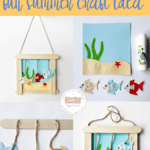
Step 1: Start by cutting a 5.5 x 5.5-inch square from light blue construction paper. This will be your ocean backdrop. Cut a wavy strip of pale yellow paper for the sandy bottom.

Step 2: Cut out three green seaweed pieces, three colorful fish, and one starfish. You can always add more sea creatures if your kids want to get creative!
Step 3: Use markers to decorate the fish with scales, draw lines on the seaweed, and add texture to the starfish for a more realistic touch.

Step 4: Glue the seaweed onto the blue background first, followed by the sandy seabed overlapping the base of the seaweed. Then, place your starfish wherever you’d like.

Step 5: Glue each pair of fish shapes together with a piece of yarn sandwiched in the middle. Cut three yarn pieces (two short and one longer) and attach the other ends to a popsicle stick.

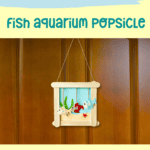
Step 6: Glue four popsicle sticks together to form a square frame.

Step 7: Glue your ocean scene to the back of the frame. Add a yarn loop to the top for hanging.

Step 8: Finally, glue the popsicle stick with the hanging fish across the top front of the frame.

Let everything dry, and your sweet little aquarium chime is ready to display!

💡Helpful Tips
- Use cardstock or construction paper for the background and sea creatures—it holds up better than regular printer paper.
- Pre-cut shapes for younger kids to make the craft more fun and less frustrating (great for preschoolers!).
- Let kids customize their aquarium with extra elements like bubbles, sea turtles, or coral made from scrap paper or stickers.

Such a splashy, fun, and oh-so-easy aquarium popsicle craft that your little ones will love. Whether you’re a mom looking for a rainy-day activity or a teacher bringing some under-the-sea magic to your classroom, this craft is a winner.
✅Grab the Free Fish Aquarium Template
Popsicle Stick Aquarium Craft

Supplies & Materials
- Sky blue paper 5.5 x 5.5 inches
- Light yellow paper for the sand
- Colored paper for fish, seagrass, and starfish
- Markers
- Scissors
- Glue
- Yarn
- 7 popsicle sticks
Instructions
- Cut a square from blue paper for your ocean background and a wavy strip from yellow paper for the seafloor.
- Cut out 3 green seagrass pieces, 3 colorful fish, and a starfish. Decorate each piece with marker details.
- Glue the seagrass to the background, then layer the sandy bottom on top. Add the starfish wherever you like.
- For the hanging fish, glue two fish shapes together with yarn in between. Repeat for all three fish.
- Cut one long and two short pieces of yarn. Attach a fish to each one and glue the tops of the yarn to a popsicle stick.
- Build a square frame using four popsicle sticks and glue the background scene to the back.
- Add a loop of yarn at the top to hang it, then glue the fish-holding stick across the top front.
- Let it dry and hang your new aquarium wind chime for all to admire!