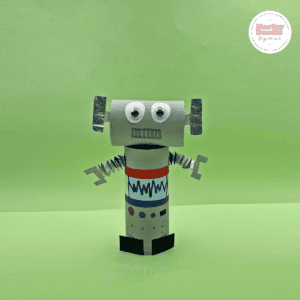
Toilet Paper Roll Robot Craft
Create your own adorable robot using our free printable template and a toilet paper roll! With easy-to-follow steps and numbered cutouts, this craft is perfect for kids and makes great use of simple supplies like construction paper, foil, and googly eyes. A fun and mess-free activity that’s perfect for home or classroom play!
Print
Supplies & Materials
- 2 toilet paper rolls
- Foil paper or aluminum foil
- Construction paper or colored card stock
- Scissors
- Markers, crayons, or pencil
- Googly eyes
- Free printable robot template reference numbers 1–9
- Glue and/or double sided tape
- Ruler
Instructions
- Cut your pieces: Print the robot template and cut out the shapes labeled 1–9 using colored construction paper and foil paper. You’ll need each numbered piece to build your robot.
Decorate the body (1–4):
- Start with the large square piece (1) as your robot’s body base.
- Glue the long foil strip (2) vertically in the center.
- Attach the two side strips (3) horizontally—one on each side of the foil.
- Place the smaller blue rectangle (4) in the center and draw a zigzag with a marker to create a robot control panel.
- Add detail: Use markers to decorate the body with fun buttons, bolts, or wires to make your robot unique.
Make the arms (foil strips):
- Cut two foil strips about 5 inches long and 2 inches wide (not numbered—use your own foil paper).
- Fold them accordion-style to create bendable, springy arms.
- Use tape or glue to secure the folds and gently pull the ends to stretch them into shape.
Build the face (5–7):
- Take the smaller rectangle (5) for the robot’s face and draw on a mouth.
- Glue googly eyes onto the oval eye pieces (6), then attach them above the mouth.
- Glue the small ear shapes (7) to each side of the face.
Assemble the head: Cut a toilet paper roll in half to make the head shorter. Wrap the face and ears around the roll and glue in place. Then attach this head to the top of a full toilet paper roll (your robot's body).
Finish the robot (8–9):
- Glue the two feet pieces (8) to the bottom of the body.
- Attach the foil arms to the sides of the body.
- Finally, glue the hands (9) to the ends of the foil arms.
- Let dry and display: Give everything time to dry completely. Then your robot is ready to play or display!